Successful dental implant treatment requires close collaboration between restorative dentists and surgeons, proper diagnostics, and orderly execution of the plan with precision. This page discusses protocol for CT-guided implant planning and the collaborative roles of both the restorative dentist and the surgeon.
What is CT-Scan Guided Planning?
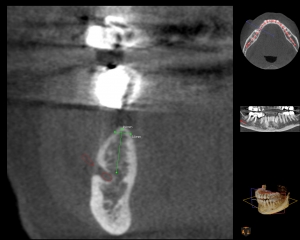
Proper planning and positioning of the dental implants with precision is vital to achieving highly cosmetic, functional, and long-lasting results. With our cone beam CT-scan along with 3-dimensional treatment planning, we can place the implants in the exact position required to support the overlying crown or other prosthesis. It also provides exact dimensions of the bone and surrounding structures such as nerves and sinuses, so that implant placement can be done with accuracy and safely.
When is CT-guided planning recommended?
CT-guided implant planning is beneficial in patients with full mouth implant restorations, aesthetic cases where tissue and implant positioning is critical, or patients with bone loss or other deformities. CT-guided planning provides great precision to the overall treatment but may not be required in every patient as conventional planning and implant placement can be done with great accuracy and outcomes in many situations. It is important to use CT-guided planning with good rational and only when it offers great benefits to the patient and the ultimate outcome of the treatment.
Protocol for CT-Guided implant planning:
1. Prepare imaging guide
Fully edentulous patients- Patient’s existing denture maybe duplicated with acrylic or use the denture itself for imaging. Either way, markers can be placed in the denture in various positions by preparing holes and placing gutta percha.
Partially edentulous patients- For simple cases where you have good occlusion with single missing teeth or two to three adjacent missing teeth, you can fabricate an imaging guide yourself. For more complex cases where occlusion is uncertain or there are multiple missing teeth, it is best to have your laboratory do a complete wax-up and fabricate an imaging guide.
Steps:
- Take impressions for study model and pour in stone.
- Make an Essix tray: If a tooth requires extraction, you can take a pre-extraction impression, do a suck down with Essix, then remove the tooth on model. If a tooth is already missing, place appropriate size denture teeth and hold with wax. Then do a suck down with Essix to make the tray. Cut out the Essix material from models and trim and polish.
- Mix Barium sulfate with clear orthodontic acrylic (30:70 ration) and liquid. Load it into a syringe and place into the Essix tray where the missing teeth are.
- Place tray back on the model and allow to set for about two hours. Remove tray, trim, and polish margins.
- Give the imaging guide to patient to take to surgeon for imaging.
2. Diagnostic CT scan
Diagnostic CT scans can be completed right in the comfort of our office. It is fast, safe, and very comfortable. The surgeon places the imaging guide in the mouth and completes the scan. The 3-dimensional images are immediately evaluated and bone quantity and quality for the planned dental implants are determined.
A CT scan may also be done without the radiographic marker. In this case it can be used to measure existing bone and evaluate other structures in proximity. However, the imaging guide provides key references for the surgeon and the restorative dentist for precise treatment planning.
3. Three-dimensional treatment planning
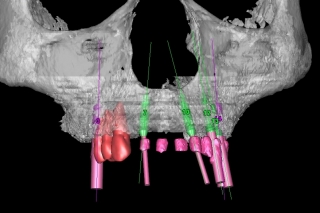
Next the CT data is reconstructed into a 3-dimensional computer model. With a special software (i.e. Simplant), the surgeon can now position the implants in the desired locations- all virtually. The correct width and length of the implants are selected to assure safe placement with respect to surrounding nerves and sinuses. This 3-dimensional model can be easily shared with the restorative dentist to make sure they are positioned with precision for the support of future prosthesis.
4. Surgical guide
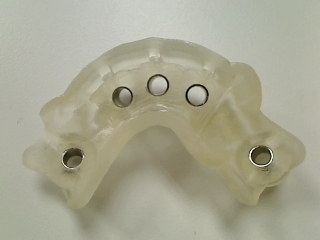
The computer dental implant work-up is then sent to a special laboratory to fabricate surgical guides which will allow the surgeon to place the implants exactly according to the 3-dimensional virtual work-up. The surgical guides are made to fit patient’s mouth with precision, therefore allowing the surgeon to position the implants exactly as planned.


